Surf fishing is an exciting way to connect with the coast and target a wide range of fish, but store-bought rigs can get expensive and don’t always fit my needs. I prefer to build my own surf fishing leaders and rigs, which helps me save money and puts me in the driver’s seat for customizing my setup based on local conditions, target species, and the type of bait I want to use.
Over the years, I picked up a handful of reliable rigs that handle most surf fishing situations. Two of my favorites are the fish finder rig and the high-low rig. Here’s how I put each one together, plus some straightforward tips for picking components and keeping my tackle sorted.
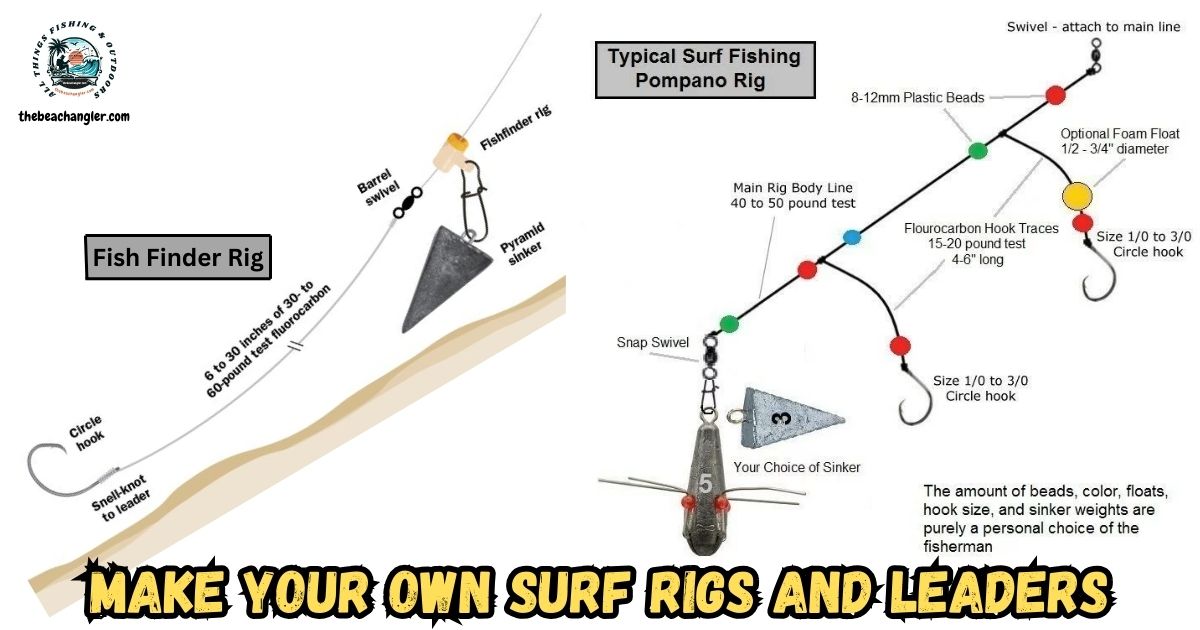
Fish Finder Rig: Great for Big Baits and Natural Presentations
The fish finder rig is what I reach for when I want my bait to look as natural as possible, since it lets the bait drift freely in the current. This appeals to larger fish like striped bass, red drum, or bluefish. I also love how simple and adjustable this rig is.
What You Need for a Fish Finder Rig
- Leader line: I typically use 12 to 24 inches of strong monofilament or fluorocarbon, ranging from 30 to 50-pound test, depending on my target.
- Barrel swivel: This connects the main line to the leader and stops the rig from twisting.
- Sinker slider: A plastic sleeve that lets the sinker move up and down the main line, helping the bait move more naturally.
- Pyramid or egg sinker: The weight attaches to the slider and keeps the bait anchored in the surf.
- Bead: Placed between the sinker slider and swivel to protect the knot.
- Hook: I choose a circle or octopus hook, tweaking the size based on my bait and the fish I’m after.
How I Put Together a Fish Finder Rig
- Tie the hook: I attach the hook to one end of the leader line using a snell knot for a straight pull and solid hookups.
- Attach the swivel: Then, I tie the other end of the leader to one end of the barrel swivel, usually with a clinch or Palomar knot.
- Thread the main line: Slide the sinker slider onto the main line, followed by the bead.
- Connect lines: Tie the main line to the other end of the barrel swivel. Now, the slider and bead can move freely above the swivel.
- Attach the sinker: Clip or tie the pyramid or egg sinker to the sinker slider’s snap. The rig’s ready for bait and a cast.
High Low Rig: Two Baits, More Action
If I want to boost my odds or try two different baits at once, I go with the high-low rig, also known as the dropper loop rig. This setup shines when whiting, pompano, or croaker are biting, and it lets me cover more of the water column.
What You Need for a High Low Rig
- Leader line: Usually, I use 36 to 48 inches of 30 to 50-pound monofilament. Bigger or rougher surf calls for a heavier line.
- Barrel swivel: Goes at the top to tie the rig to the main line and cut down on line twist.
- Hooks: Two smaller circle or J-hooks, with size based on what’s biting.
- Sinker: A pyramid or sputnik sinker to keep the rig anchored on the sandy bottom.
How I Build a High-Low Rig
- Make the dropper loops: I take the leader and tie two dropper loops 12 to 18 inches apart, starting the first about 12 to 18 inches from the bottom. Each loop gets twisted around the line six times before pulling the loop through, moistening, and pulling tight.
- Add the hooks: I thread each hook onto a dropper loop using a loop-to-hook connection or a simple dropper loop knot.
- Add the swivel: The barrel swivel goes on the top tag end of the leader with a clinch knot.
- Tie on the sinker: Tie or snap the sinker onto the bottom of the leader for easy changes.
Choosing the Right Components for Your Surf Rigs
The gear I use—strength, size, and materials—really affects my success. The right components mean my rig survives big fish and rough surf, giving me the best shot at landing my catch.
- Leader strength and length: Heavier and shorter for big fish or dirty water, lighter and longer for clear water or shy fish.
- Hooks: I match the hook size to the bait and targeted species. Tiny hooks for small-mouthed surf fish, big ones for predator species.
- Sinkers: Heavy for strong current and surf, lighter if it’s calm. This prevents the bait from getting buried.
- Swivels: I stick with sturdy black barrel swivels, avoiding ones that are too lightweight.
Knots and Assembly Tips
Good knots keep the rig from falling apart under pressure. I trust a few basics I’ve practiced until I can tie them by feel.
- Snell knot: The best for tying hooks to a leader, keeping the hook straight and secure.
- Improved clinch knot: My go-to for swivels and tying lighter lines. It works great for both monofilament and fluorocarbon.
- Dropper loop: The classic knot for making loops in the leader when building high-low rigs or for adding extra bait.
- Knot care: I always wet knots before tightening, to prevent heat and weakening caused by friction.
Staying Organized: Rig Storage and Prep
Prepping rigs at home saves time and hassle once I hit the beach. I tie a bunch of each kind before I go, then keep them organized on foam spools, in zip bags, or on a rig board. If one gets twisted or broken, I just grab another and go.
I set aside one tackle box just for rig and leader supplies—spools of leader line, sinkers, beads, swivels, and extra hooks—so reties or tweaks happen fast, with no digging around. Labeling each rig or spool with the type and hook size saves guesswork on the sand.
Extra Tips for DIY Surf Fishing Rigs
- Match your rig to your target: Big predators call for heavy leaders and larger hooks. If I’m after schooling fish, I lighten up and drop hook size.
- Use a lighter line for dropper loops: Sometimes, I use a lighter snood (the piece that connects the hook to the rig) on the high-low setup. This way, if a hook gets snagged, the snood breaks first, sparing the rest of the rig.
- Play with beads and floats: I like to add bright beads or small floats near the hook in rough or colored water—they can help keep the bait visible and up off the bottom to grab the fish’s attention.
Building surf fishing leaders and rigs myself gives me more control and flexibility. With some basic tools, practice with knots, and a little prep work, I can easily adjust my gear for nearly any surf fishing scenario I run into. I think every surf angler should give making their own rigs a try—you’ll save money, learn a ton about the fish you’re after, and put more fish on the sand.
Check Out Our Most Recent Articles:
- Field-testing The Quantum Benchmark Spinning Reel
- Z-man Swag Lt Swimbait
- Kastking Kapstan Se Saltwater Spinning Reel
- The Daiwa Crosscast Surf Reel
- Kastking Megajaws Elite Saltwater Baitcasting Reel
- Nomad Switcher Shrimp Lures
As always, stay safe, enjoy the journey, and please try to leave it cleaner than you found it. If you have any comments, questions, ideas, or suggestions, please leave them in the comment section below, and I’ll get back to you ASAP. You can follow us on Facebook: Rex The Beach Angler, Instagram: thebeachangler7, Twitter: @AnglerBeach, and YouTube: Man Art Creations.
P.S. Thanks so much for checking out our blog; we really appreciate it. Just so you know, we may receive a commission if you click on some of the links that appear on our site. This helps us keep our content free and up-to-date for everyone. We appreciate your support!

A life long surf fisherman with 50+ years of experience, I am also an avid hunter and outdoorsman. I will be sharing my passion for the outdoors with you so be prepared for hunting, fishing, camping, hiking and more. Along with gear reviews and the latest trends and innovations in the outdoor industry.
Do you have a leader diagram with a spider weight?
Hey Allen,
Here is a photo of a surf rig I made with a spider weight. The ruler is for scale. I make these using wire to avoid getting cut off by sharks and spanish mackerel. I also make my own spider weights.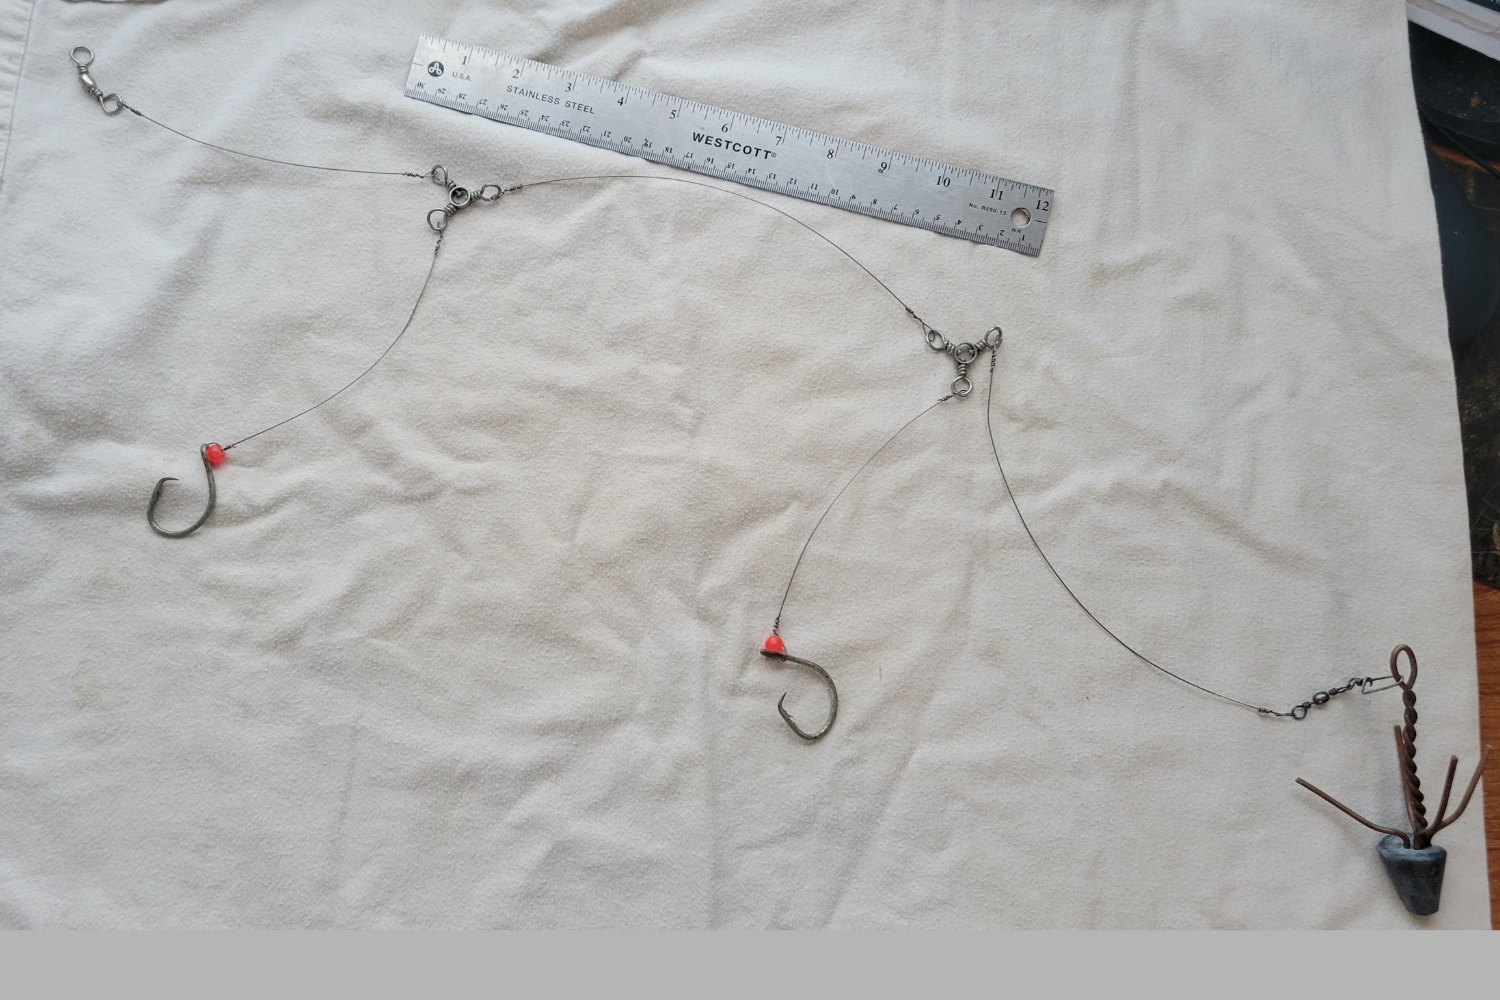
Hope that helps,
Rex