
Bringing solar power to remote beach camping can make your outdoor experience a lot more comfortable, especially when access to traditional electricity isn’t an option. I’ve found that with the right portable solar gear, I can keep my devices charged, run small appliances, and even prepare food without needing fuel or relying on generators. Here’s an all-in-one guide to picking solar power options that actually work when you’re away from the grid and close to the ocean.
QUICK LOOK: Tips for Solar Power and Beach Camping
- Pick a Sunny, Stable Spot. I place the panels on a towel or mat to keep them clean and angle them toward midday sun. I use rocks or sand weights at the corners if it’s windy.
- Anchor Everything Down. Gusty beach winds can toss panels around. I tie down the edges or use built-in loops for extra security.
- Connect and Monitor. I hook up my power station or charger to the panels right away so I can store energy during the brightest part of the day. An app or built-in indicator helps track charging speed and battery life.
- Protect Electronics. I always keep ports closed, devices covered, and the power station out of direct sun to reduce heat buildup. Sometimes I drape a light colored towel over the power station for shade.
- Keep Panels Clean. Wiping sand and salt off every night keeps the panels working efficiently. Even a light film will reduce charging speed.
- Protect Cables and Connectors. Using covers and storing cables away from the sand prevents malfunctions later. Old sunglasses bags make great carry pockets for cords.
- Store Power. I always charge up my power station at home before heading out so I can use stored energy in bad weather or at night.
- Plan Your Charging Needs. Make a list of each device you want to run. I count up their watt-hours to make sure I’m bringing enough battery and solar panel wattage. For small devices, look for power banks with built-in lanterns or wireless charging.
- Backup Light Source. As a rule, never rely on your solar setup alone for safety gear or navigation. Pack a handcrank light or glow sticks in case you get a run of cloudy days.
- Morning Setup. Put panels out first thing in the morning to get every possible watt. Even hazy daylight can give a boost to the battery.
What Makes Solar Power Useful at Remote Beaches?
Remote beach camping is different from camping in the woods or at serviced campgrounds. There’s usually no electrical hookup, no nearby convenience store, and plenty of sun, but also a lot of wind, sand, and humidity. Solar technology has come a long way, making it possible to charge up just about anything if you bring the right equipment.
For me, knowing which solar devices to pack depends on what I need to power and how long I’m staying out. The unpredictable environment is another factor. Electrical devices are at risk from sand, salty air, heat, and water splashes.
Having equipment built to survive these conditions is really important if you want it to last for more than one trip. The right solar setup lets you step up your comfort at camp, keep your connections open, and enjoy more modern conveniences without damaging delicate gadgets.
Types of Solar Power Setups for Beach Camping
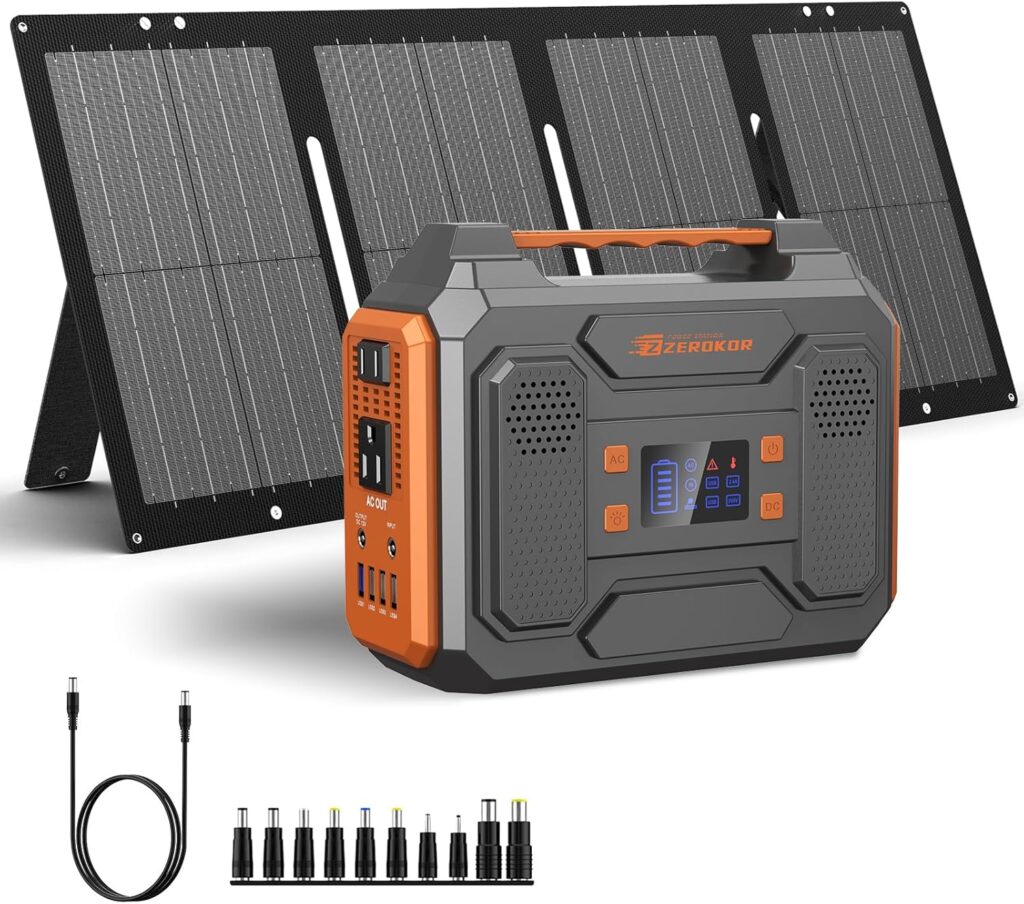
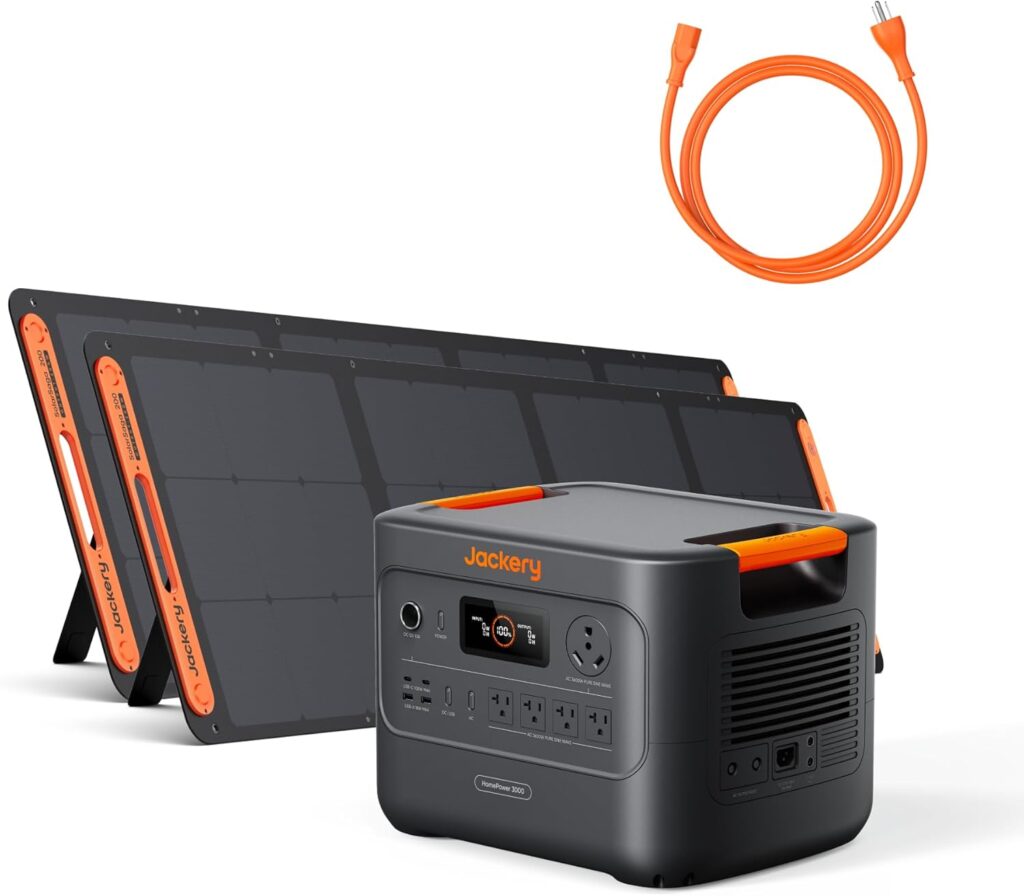
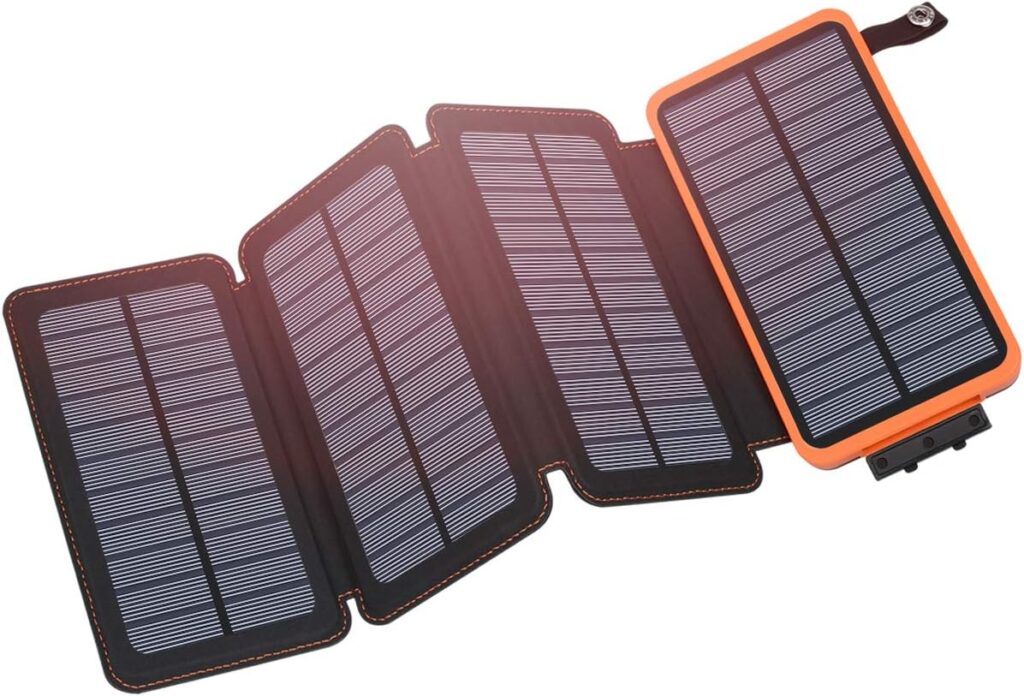
Solar power gear for camping falls into two broad categories: full-size portable power stations with panels, and compact solar chargers or power banks. Picking between them comes down to how much power you need and how mobile you want to stay.
- Portable Solar Generator Kits: These come with both a power station (an energy storage device with various outlets) and matching solar panels. They work great if you’re camping with a group or want to power things like fans, minifridges, laptops, or anything else with higher energy demands.
- Compact Solar Chargers and Power Banks: If you’re just looking to keep your phone, camera, or small flashlight powered, these smaller options don’t take up much space and can be recharged directly by the sun wherever you hike.

For folks who want to mix in some variety, there are solar gadgets for all needs: lanterns, radios, bug zappers, GPS gear, and even string lights made for outdoor use. Solar can cover all the basics and a few next-level cool extras.
Key Solar Power Gear Features to Pay Attention To
Before I invest in any new solar setup for the beach, there are a few features I check every time. These factors can make or break your experience when you’re dealing with sand and saltwater.
- Waterproof and Dustproof Ratings: You’ll often see ratings like IP65 or IP67. These tell me how well-protected the gear is from splashing waves or blowing sand. I always pick equipment with a rating of at least IP65 when I’m going to the beach. Anything less, and you risk damage from sudden rain or ocean spray.
- Rugged Build: Equipment with sealed ports, rubber covers, and tough outer shells hold up better against drops and rough handling. After a few beach camping trips, I realized that a strong case is worth its weight in gold when sand gets everywhere.
- Foldable or Flexible Panels: Foldable or rollable panels pack smaller and are easier to set up on uneven sand. I find blanket-style panels the easiest to position for the best sunlight. You can toss them on your tent roof, drape them over a cooler, or lay them flat on a towel.
- Battery Capacity: For short trips, a station around 500Wh might be enough for phones and lights. For longer stays, I size up to 1000Wh or more, especially if I run a cooler or other essentials. Keep in mind that cloudy weather will slow down charging, so more capacity means more peace of mind.
Quick Start Guide: Setting Up Solar Power at the Beach
Setting up my solar gear at a campsite is usually pretty simple. Here’s how I do it—
- Pick a Sunny, Stable Spot. I place the panels on a towel or mat to keep them clean and angle them toward midday sun. I use rocks or sand weights at the corners if it’s windy.
- Anchor Everything Down. Gusty beach winds can toss panels around. I tie down the edges or use built-in loops for extra security.
- Connect and Monitor. I hook up my power station or charger to the panels right away so I can store energy during the brightest part of the day. An app or built-in indicator helps track charging speed and battery life.
- Protect Electronics. I always keep ports closed, devices covered, and the power station out of direct sun to reduce heat buildup. Sometimes I drape a light colored towel over the power station for shade.
For best results, move your panels with the sun a couple of times during the day, and regularly check connections for grit or moisture to keep things running smoothly.
RealWorld Solar Power Challenges and How I Handle Them
- Salt and Corrosion: Beach air speeds up corrosion compared to other outdoor spots. I pick gear with noncorrosive contacts and avoid leaving metal exposed when I’m not using it. Wiping devices with a damp cloth can remove salt buildup and extend their life.
- Sand and Grit: Tiny particles can get everywhere. I use zippered carrying cases for my charger and panels, and I clean off dust each night. Ziplock bags or dry sacks for cables also keep things tidy.
- Variable Sunlight: Weather can switch up quickly. I bring slightly oversized panels compared to my minimum needs for cloudy days, or bank more battery when the sun is strongest. If rain or heavy clouds move in, I ration device use to prioritize the essentials.
Waterproof Ratings: What Do the Numbers Mean?
IP ratings are given as two numbers. The first is for dust protection, and the second is for water. For example, IP65 means the panel is dust-tight and protected from water jets. For the beach, at least IP65 is a good target, but IP67 (protection from submersion) is even better. Keep in mind that no device is invincible – always dry off gear when you can.
Choosing the Right Panel Type
Monocrystalline panels usually work best, especially if you want to produce as much power as possible in a small space. Flexible or blanket-style panels are easiest to pack, but rigid folding panels might hold up better if you camp frequently in rough conditions. If you plan to travel by kayak or SUP, the lighter, flexible panels are a great pick for portability.
Solar Cooking: Another Clean Power Option
Cooking at the beach without a stove or fuel has gotten easier thanks to solar ovens. I use these when fire restrictions are in place, or when I’d rather not shovel hot coals in the sand.
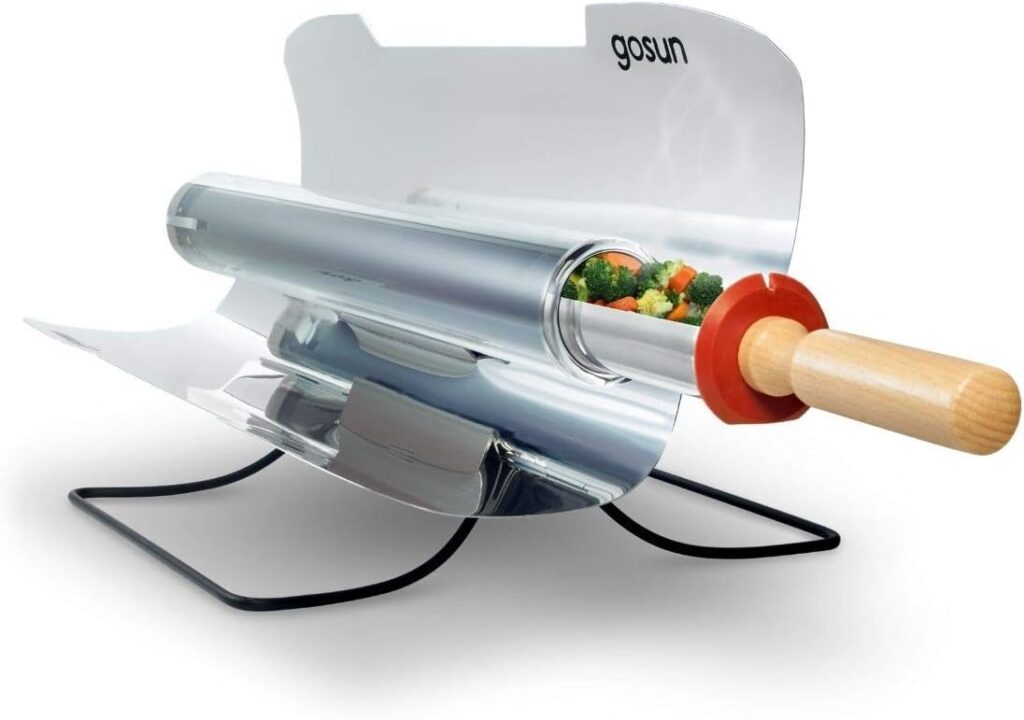
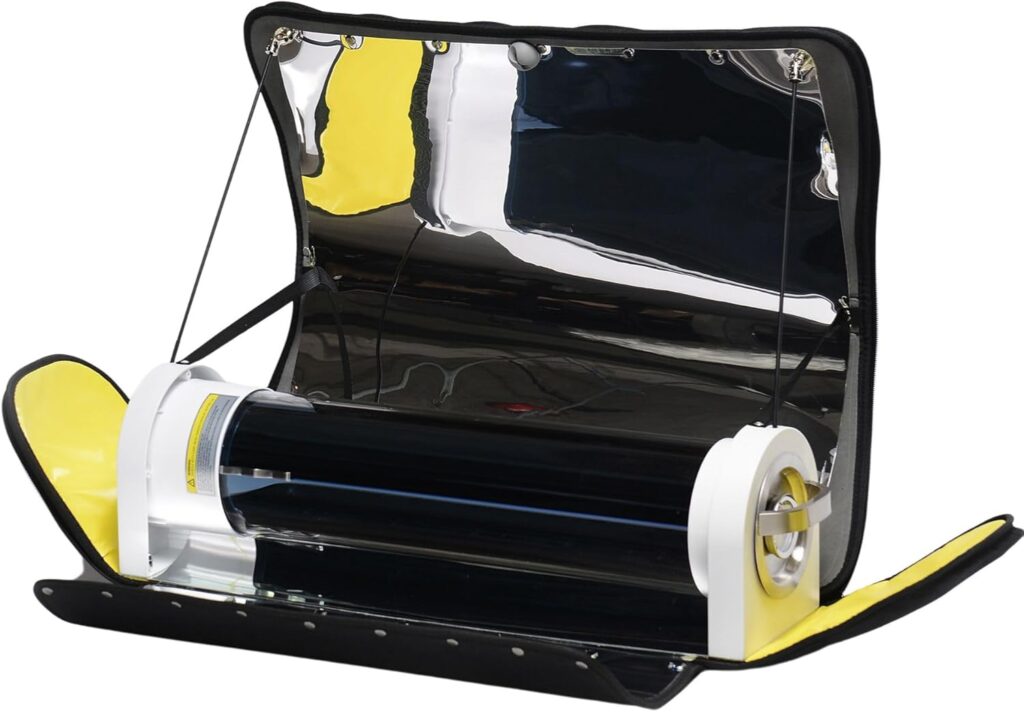
- Solar Ovens: Brands like GoSun make compact ovens that use the sun’s energy to cook food in a sealed tube. I’ve cooked hot dogs, veggies, and even fish fillets while relaxing near my tent using this setup.
- How It Works: You load food into the tube, point it at the sun, and wait. Some models can cook a full meal in about 2030 minutes. I keep a small digital thermometer handy to double-check the internal temperature of any meats.
- What I Like: There’s no smoke or fire risk. Cleanup is easy, and I don’t have to haul extra fuel. The novelty factor is also pretty eye-catching—sun-cooked beach snacks are always a hit.
If you’re in a group, consider bringing a backup sandwich lunch just in case the clouds roll in halfway through cooking. For solo outings on a sunny day, though, solar cooking is hard to beat.
Matching Solar Power Setups to Your Camping Style
- Weekend Trips: I carry a 300–500Wh portable station with a foldable 100W panel. This covers my lights, phone, and camera for a few days without a problem. I always bring a small headlamp as backup, just in case.
- Longer Stays (or Family Groups): For more devices or appliances, I bump up to a 1000Wh unit paired with up to two 120W solar panels. This lets me run fans or a minifridge if needed—and share a charging station with friends.
- UltraLight (Backpackers): A small solar charger or a rugged power bank clipped to my daypack charges up my phone or GPS with little extra weight. Just remember, minimalist setups are great for emergencies and light use, but can’t keep a laptop running long-term.
Extra Tips for Getting the Most From Solar Power on the Beach
- Keep Panels Clean. Wiping sand and salt off every night keeps the panels working efficiently. Even a light film will reduce charging speed.
- Protect Cables and Connectors. Using covers and storing cables away from the sand prevents malfunctions later. Old sunglasses bags make great carry pockets for cords.
- Store Power. I always charge up my power station at home before heading out so I can use stored energy in bad weather or at night.
- Plan Your Charging Needs. Make a list of each device you want to run. I count up their watt-hours to make sure I’m bringing enough battery and solar panel wattage. For small devices, look for power banks with built-in lanterns or wireless charging.
- Backup Light Source. As a rule, never rely on your solar setup alone for safety gear or navigation. Pack a handcrank light or glow sticks in case you get a run of cloudy days.
- Morning Setup. Put panels out first thing in the morning to get every possible watt. Even hazy daylight can give a boost to the battery.
Frequently Asked Questions
What should I look for in a solar kit for the beach?
I focus on solar kits with high IP waterproof and dustproof ratings, foldable panels, enough battery storage for my devices, and strong connectors that don’t get clogged with sand.
Can I run a cooler or fan directly from solar at the beach?
Yes, as long as you size your power station and panels to handle the appliance’s wattage. I check the device’s specs, estimate how long I will use it, and bring extra solar capacity for backup.
Are solar ovens really worth using?
For me, solar ovens work well for simple meals and snacks, especially when fire bans are in place. I get the best results on sunny days, but I’ve even cooked with them during partly cloudy weather.
Starting Your Own Solar-Powered Beach Camping Adventure
Packing solar gear for remote beach camping gives me the freedom to explore more and worry less about battery life. Picking equipment designed for wet, windy, and sandy conditions is really important to making solar power work at the beach.
With a bit of planning, I enjoy all the discoveries that come with off-grid adventures. Plus, I get hot meals, cold drinks, and fully charged devices every step of the way. Ready for your own trip? Make your packing list, check the weather, and let your solar setup set you free on the sand.
Check Out Our Most Recent Articles:
- Shimano Tiagra Reel Review

- The Daiwa Exist Spinning Reel

- Shimano Spheros SW Spinning Reel

- Daiwa Emcast Surf Rod Review

- The Shimano Socorro SW Spinning Reel
- Daiwa Sealine Surf Rod Review
As always, stay safe, enjoy the journey, and please try to leave it cleaner than you found it. If you have any comments, questions, ideas, or suggestions, please leave them in the comment section below, and I’ll get back to you ASAP. You can follow us on Facebook: Rex The Beach Angler, Instagram: thebeachangler7, Twitter: @AnglerBeach, and YouTube: Man Art Creations.
P.S. Thanks so much for checking out our blog; we really appreciate it. Just so you know, we may receive a commission if you click on some of the links that appear on our site. This helps us keep our content free and up-to-date for everyone. We appreciate your support!

A life long surf fisherman with 50+ years of experience, I am also an avid hunter and outdoorsman. I will be sharing my passion for the outdoors with you so be prepared for hunting, fishing, camping, hiking and more. Along with gear reviews and the latest trends and innovations in the outdoor industry.